
Here is the Kranen guide to installing your brand new 3-1 Boiling Water Tap. Please, if you are uncertain seek the advice of a professional plumber.
Please ensure you read all the important information prior to starting the below guide.
Tap installation
First install the hoses into the bottom of the boiling water tap - hand tighten by turning clockwise:

Insert the boiling water tap through the hole in your worktop and install the Rubber Washer followed by a Metal Washer and then the Fitting Nut onto the Barrel Thread (hand tighten the Fitting Nut by turning clockwise):
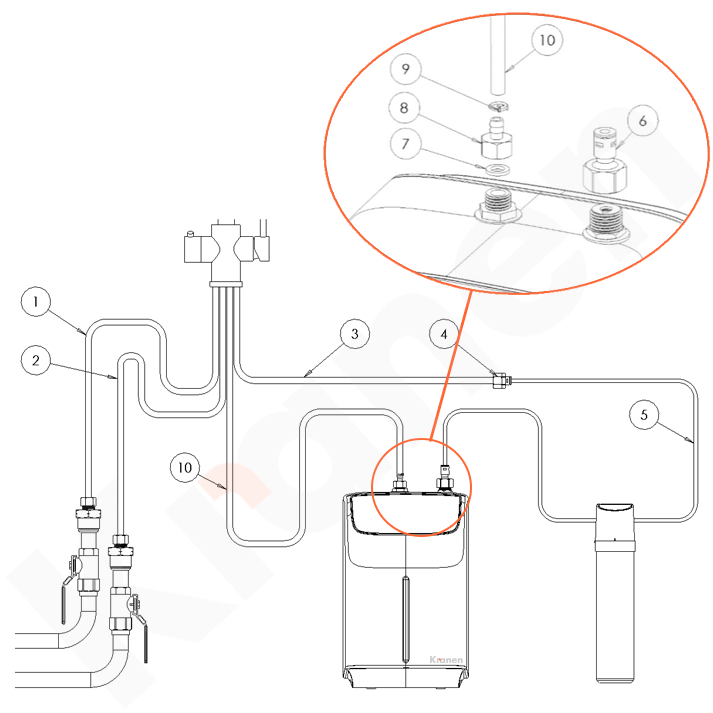
Boiler and pipework guide
Important:A switched plug socket is required to power the boiler, this must be fitted in accordance with the current IEE Wiring Regulations (if unsure, consult a qualified electrician).
Do not power up the boiler tank until all pipework is complete and checked to ensure there are no leaks.


Select a place to position your boiler tank underneath your sink. Ensure none of the hoses coming from the bottom of your boiling water tap are twisted or stretched. They must reach the boiler comfortably.
Fit the filter close to the boiler leaving enough space for a small amount of pipe between the filter and the boiler. This can be screwed to the wall, or cupboard sides using the fixing holes on either side of the filter.
Attach the 1/2" Female BSP to 6mm Push Fit adapter to the boiler shown in figure 6. Do not over tighten as this will cause the washer to split and the system will leak:

Fasten the 3/8" attachment to the boiler (figure 8) ensuring you insert the washer (figure 7) first. Again, don't overtighten or the washer will split and leak:
You now need to turn off your mains water via the means supplied. This maybe lever taps, or isolation valves. If unsure, please seek professional advice before continuing.
Fasten the blue stripe (max 3bar) hose to the incoming mains cold water pipe (figure 1). You will need an adjustable spanner or wrench:
Now fasten the red stripe (max 3bar) hose to the incoming hot water pipe (figure 2). You will need an adjustable spanner or wrench:
Fasten the blue stripe (water to boiler) hose to the connector (figure 4). Ensure the hose has no twists or kinks and do not overtighten when fastening:
You must now cut the 1m PE Pipe into two lengths before installing. The size of each will depend on your positioning of the filter and boiler tank. When cutting the pipe make sure there are no bends or kinks as this will restrict flow through the boiler tank.
The first length of PE pipe (figure 5) is to be fitted between the 6mm Push Fit connector and the water filter. The second length (figure 5.5) should be installed from the water filter and the boiler.
To secure the PE Pipe into the push fit pieces, push into the hole until it stops. Then pull it to make sure it is fitted properly. If it is fitted correctly the PE pipe will remain connected to the fitting:
Lastly connect the pre-installed silicone hose (figure 10) to the boiler. Please ensure the silicone hose is snug around the fitting and don't forget to install the fixing clip (figure 9) over the hose:
Priming the boiler
Before switching the power onto the boiler tank you must prime it to ensure there are no leaks.
Turn your mains water back on by opening the isolation valves. If unsure, please seek professional advice before continuing.
Press and turn the hot water handle on your new boiling water tap. You may need to wait around 90 seconds before water begins to come out of the tap. The water won’t be hot as we still have the power to the boiler switched off.
Check all the pipe connections for leaks. If there are any leaks, firstly ensure the connectors are tight.
If you try to power on the boiler before priming the display will read an ‘E3’ error message. This is because there is no water in the tank.
Turning on your boiler
Connect the boiler plug to the plug socket.
Touch the illuminated red on/off button once.
You should begin to see activity on the digital display on your boiler.
The left of the display will show the current temperature of the water inside the tank. The right of the display will show the temperature it is set to heat up to. Once heating has started the display will flash, the left-hand temperature will rise until it matches the set temp.
Congratulations. You have now installed your new Kranen Boiling Water Tap.
Click here to download our installation instructions as a PDF.
Important information
This product can cause harm if installed incorrectly and should only be installed by a competent person, if you feel for any reason unsure about the installation, please contact a qualified plumber or electrician to install the appliance. This electronic instant hot water appliance is not intended for use by persons (including children) with reduced physical, sensory, or mental capabilities, or lack of experience and knowledge, unless they have been given supervision or instruction concerning use of appliance by a person responsible for their safety. Children should be supervised to ensure that they do not play with the electronic instant hot water appliance or instant hot water tap, a safety spring back is used to control the flow of the near boiling water for additional safety. Failure to follow these instructions could invalidate your warranty.